行为模仿
Writeup
The goals / steps of this project are the following:
- Use the simulator to collect data of good driving behavior
- Build, a convolution neural network in Keras that predicts steering angles from images * Train and validate the model with a training and validation set
- Test that the model successfully drives around track one without leaving the road
- Summarize the results with a written report
Files Submitted & Code Quality
1. Submission includes all required files and can be used to run the simulator in autonomous mode.
My project includes the following files:
- model.py containing the script to create and train the model
- drive.py for driving the car in autonomous mode
- model.h5 containing a trained convolution neural network
- writeup_report.md or writeup_report.pdf summarizing the results
- writeup_report.md or writeup_report.pdf summarizing the results
2. Submission includes functional code
Using the Udacity provided simulator and my drive.py file, the car can be driven autonomously around the track by executing python drive.py model.h5 img_floder.
3. Submission code is usable and readable
The model.py file contains the code for training and saving the convolution neural network. The file shows the pipeline I used for training and validating the model, and it contains comments to explain how the code works.
Model Architecture and Training Strategy
1. An appropriate model architecture has been employed
My model consists of a convolution neural network with 3x3 or 5x5 filter sizes and depths between 24 and 64 (model.py lines 109-113)
The model includes RELU layers to introduce nonlinearity (code line 109-118), a tanh layer is used in the final layer(code line 119), and the data is normalized in the model using a BatchNormalization layer (code line 107).
2. Attempts to reduce overfitting in the model
The model was trained and validated on a big data sets to ensure that the model was not overfitting.
The model was tested by running it through the simulator and ensuring that the vehicle could stay on the track.
3. Model parameter tuning
The model used an adam optimizer, so the learning rate was not tuned manually (model.py line 125).
4. Appropriate training data
Training data was chosen to keep the vehicle driving on the road. I used a combination of center lane driving, recovering from the left and right sides of the road.
For details about how I created the training data, see the next section.
Model Architecture and Training Strategy
1. Solution Design Approach
I followed the structure in Nvidia end2end paper.
The network is working for real world cars and I think it must work for a simulated car.
In order to gauge how well the model was working, I split my image and steering angle data into a training and validation set. I found that my first model had a low mean squared error on the training set but a high mean squared error on the validation set. This implied that the model was overfitting.
To combat the overfitting, I modified the model by less epochs. Then I retrain the model.
The final step was to run the simulator to see how well the car was driving around track one. There were a few spots where the vehicle fell off the track, and fall into river. To improve the driving behavior in these cases, I record my driving in these place and fine tune my model.
At the end of the process, the vehicle is able to drive autonomously around the track without leaving the road.
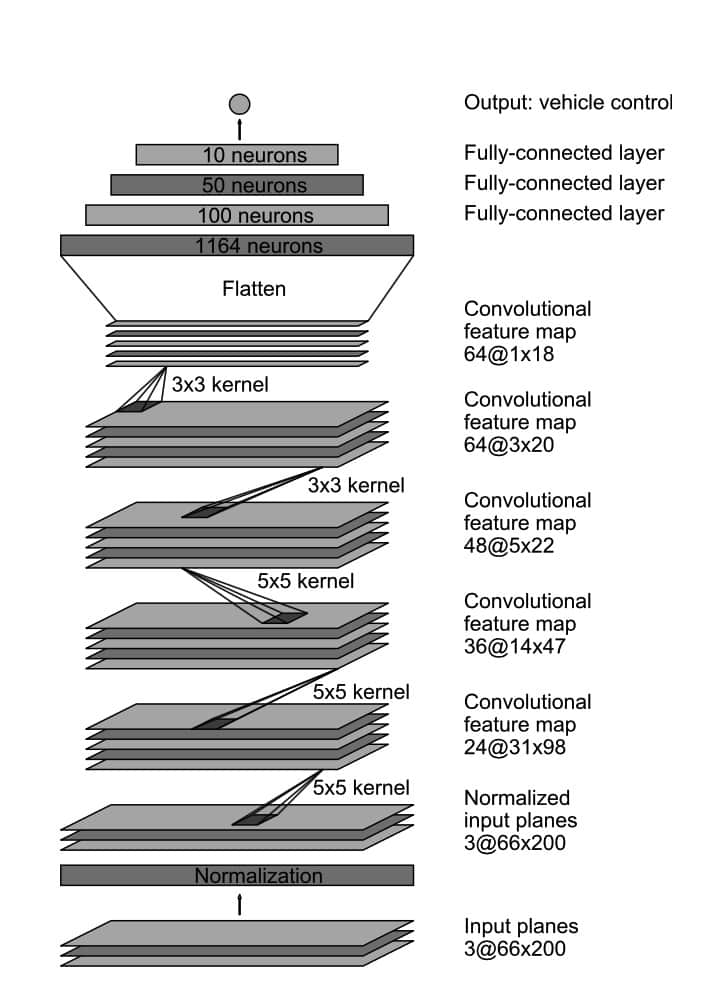
2. Final Model Architecture
The final model architecture (model.py lines 105-119) consisted of a convolution neural network with the following layers and layer sizes.
Here is a visualization of the architecture.
| layer | params |
|---|---|
| conv | kernel_size 5x5, strides (2,2), output 24 |
| conv | kernel_size 5x5, strides (2,2), output 36 |
| conv | kernel_size 5x5, strides (2,2), output 48 |
| conv | kernel_size 3x3, strides (2,2), output 64 |
| conv | kernel_size 3x3, strides (2,2), output 64 |
| fc | 1164 |
| fc | 100 |
| fc | 50 |
| fc | 10 |
| fc | 1 |
3. Creation of the Training Set & Training Process
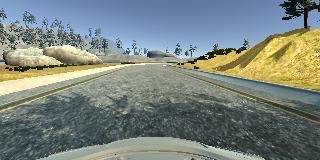
To capture good driving behavior, I first recorded two laps on track one using center lane driving. Here is an example image of center lane driving:
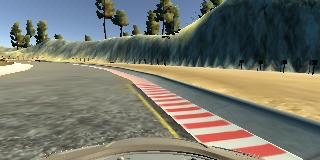
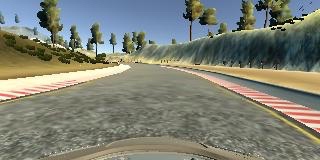
I then recorded the vehicle recovering from the left side and right sides of the road back to center so that the vehicle would learn to adjust to center of road. These images show what a recovery looks like starting from right and back to center :

Then I repeated this process on track two in order to get more data points.
To augment the data set, I do not flipped images and angles, I drive the car in the simulator in reverse direction.
I finally randomly shuffled the data set and put 10% of the data into a validation set.
I used this training data for training the model. The validation set helped determine if the model was over or under fitting. The ideal number of epochs was 25 as evidenced by several attempts. I used an adam optimizer so that manually training the learning rate wasn't necessary.